5. Binding Portions of a Site Map
In the previous example, the TreeView shows the structure of the site map file exactly.
However, this isn't always what you want. For example, you might not
like the way the Home node sticks out because of the XmlSiteMapProvider
rule that every site map must begin with a single root.
One way to clean this up is to configure the
properties of the SiteMapDataSource. For example, you can set the
ShowStartingNode property to False to hide the root node:
<asp:SiteMapDataSource ID="SiteMapDataSource1" runat="server"
  ShowStartingNode="False" />
Figure 5 shows the result.
This example shows how you can hide the root node.
Another option is to show just a portion of the complete site map,
starting from the current node. For example, you might use a control
such as the TreeView to show everything in the hierarchy starting from
the current node. If the user wants to move up a level, they could use
another control (such as the SiteMapPath).
5.1. Showing Subtrees
By default, the SiteMapDataSource shows a full tree
that starts with the root node. However, the SiteMapDataSource has
several properties that can help you configure the navigation tree to
limit the display to just a specific branch. Typically, this is useful
if you have a deeply nested tree. Table 1 describes the full set of properties.
Table 1. SiteMapDataSource Properties
| Property | Description |
|---|
| ShowStartingNode | Set
this property to False to hide the first (top-level) node that would
otherwise appear in the navigation tree. The default is True. |
| StartingNodeUrl | Use
this property to change the starting node. Set this value to the URL of
the node that should be the first node in the navigation tree. This
value must match the url attribute in the site map file exactly. For
example, if you specify a StartingNodeUrl of "~/home.aspx", then the
first node in the tree is the Home node, and you will see nodes only
underneath that node. |
| StartFromCurrentNode | Set
this property to True to set the current page as the starting node. The
navigation tree will show only pages beneath the current page (which
allows the user to move down the hierarchy). If the current page doesn't
exist in the site map file, this approach won't work. |
| StartingNodeOffset | Use
this property to shift the starting node up or down the hierarchy. It
takes an integer that instructs the SiteMapDataSource to move from the
starting node down the tree (if the number is positive) or up the tree
(if the number is negative). The actual effect depends on how you
combine this property with other SiteMapDataSource properties. For
example, if StartFromCurrentNode is False, you'll use a positive number
to move down the tree from the starting node toward the current node. If
StartFromCurrentNode is True, you'll use a negative number to move up
the tree away from the current node and toward the starting node. |
Figuring out these properties can take some work, and
you might need to do a bit of experimenting to decide the right
combination of SiteMapDataSource settings you want to use. To make
matters more interesting, you can use more than one SiteMapDataSource on
the same page. This means you could use two navigation controls to show
different sections of the site map hierarchy.
Before you can see this in practice, you need to
modify the site map file used for the previous few examples into
something a little more complex. Currently, the site map has three
levels, but only the first level (the Home node) and the third level
(the individual pages) have URL links. The second-level groupings
(Information and Products) are just used as headings, not links. To get a
better feel for how the SiteMapDataSource properties work with multiple
navigation levels, modify the Information node as shown here:
<siteMapNode title="Information" description="Learn about our company"
url="~/information.aspx">
and change the Products node:
<siteMapNode title="Products" description="Learn about our products"
url="~/products.aspx">
Next, create the products.aspx and information.aspx pages.
The interesting feature of the Products node is that
not only is it a navigable page, but it's a page that has other pages
both above it and below it in the navigation hierarchy. This makes it
ideal for testing the SiteMapDataSource properties. For example, you can
create a SiteMapDataSource that shows only the current page and the
pages below it like this:
<asp:SiteMapDataSource ID="SiteMapDataSource1" runat="server"
 StartFromCurrentNode="True" />
And you can create one that always shows the Information page and the pages underneath it like this:
<asp:SiteMapDataSource ID="SiteMapDataSource2" runat="server"
StartingNodeUrl="~/information.aspx" />
NOTE
For this technique to work, ASP.NET must be able
to find a page in the Web.sitemap file that matches the current URL.
Otherwise, it won't know where the current position is, and it won't
provide any navigation information to the bound controls.
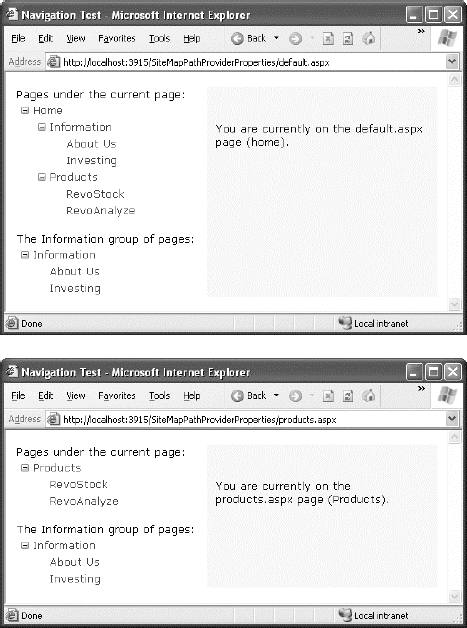
Now, just bind two navigation controls. In this case,
one TreeView is linked to each SiteMapDataSource in the markup for the
master page:
Pages under the current page:
<asp:TreeView ID="TreeView1" runat="server"
  DataSourceID="SiteMapDataSource1" />
<br />
The Information group of pages:<br />
<asp:TreeView ID="TreeView2" runat="server"
  DataSourceID="SiteMapDataSource2" />
Figure 6
shows the result as you navigate from default.aspx down the tree to
products1.aspx. The first TreeView shows the portion of the tree under
the current page, and the second TreeView is always fixed on the
Information group.
You'll need to get used to the
SiteMapDataSource.StartingNodeOffset property. It takes an integer that
instructs the SiteMapDataSource to move that many levels down the tree
(if the number is positive) or up the tree (if the number is negative).
An important detail that's often misunderstood is that when the
SiteMapDataSource moves down the tree, it moves toward
the current node. If it's already at the current node, or your offset
takes it beyond the current node, the SiteMapDataSource won't know where
to go, and you'll end up with a blank navigation control.
To understand how this works, it helps to consider an example. Imagine you're at this location in a website:
Home > Products > Software > Custom > Contact Us
If the SiteMapDataSource is starting at the Home node
(the default) and you apply a StartingNodeOffset of 2, it will move
down the tree two levels and bind to the tree of pages that starts at
the Software node.
On the other hand, if you're currently at the
Products node, you won't see anything. That's because the starting node
is Home, and the offset tries to move it down two levels. However,
you're only one level deep in the hierarchy. Or, to look at it another
way, no node exists between the top node and the current node that's two
levels deep.
Now, what happens if you repeat the same test but set
the site map provider to begin on another node? Consider what happens
if you set StartFromCurrentNode to True and surf to the Contact Us page.
Once again, you won't see any information, because the site map
provider attempts to move two levels down from the current node—Contact
Us—and it has nowhere to go. On the other hand, if you set
StartFromCurrentNode to True and use a StartingNodeOffset of −2, the
SiteMapDataSource will move up two levels from Contact Us and bind the subtree starting at Software.
Overall, you won't often use the StartingNodeOffset
property. However, it can be useful if you have a deeply nested site map
and you want to keep the navigation display simple by showing just a
few levels up from the current position.
NOTE
All the examples in this section filtered out
higher-level nodes than the starting node. For example, if you're
positioned at the Home > Products > RevoStock page, you've seen
how to hide the Home and Products levels. You haven't seen how to filter
out lower-level nodes. For example, if you're positioned at the Home
page, you'll always see the full site map, because you don't have a way
to limit the number of levels you see below the starting node.
5.2. Using Different Site Maps in the Same File
Imagine you want to have a dealer section and an
employee section on your website. You might split this into two
structures and define them both under different branches in the same
file, like this:
<siteMap xmlns="http://schemas.microsoft.com/AspNet/SiteMap-File-1.0" >
  <siteMapNode title="Root" description="Root" url="~/default.aspx">
    <siteMapNode title="Dealer Home" description="Dealer Home"
     url="~/default_dealer.aspx">
      ...
    </siteMapNode>
<siteMapNode title="Employee Home" description="Employee Home"
      url="~/default_employee.aspx">
      ...
    </siteMapNode>
  </siteMapNode>
</siteMap>
To bind the SiteMapDataSource to the dealer view
(which starts at the Dealer Home page), you simply set the
StartingNodeUrl property to "~/default_dealer.aspx". You can do this
programmatically or, more likely, by creating an entirely different
master page and implementing it in all your dealer pages. In your
employee pages, you set the StartingNodeUrl property to
"~/default_employee.aspx". This way, you'll show only the pages under
the Employee Home branch of the site map.
You can even make your life easier by breaking a single site map into separate files using the siteMapFile attribute, like this:
<siteMap xmlns="http://schemas.microsoft.com/AspNet/SiteMap-File-1.0" >
  <siteMapNode title="Root" description="Root" url="~/default.aspx">
    <siteMapNode siteMapFile="Dealers.sitemap" />
    <siteMapNode siteMapFile="Employees.sitemap" />
  </siteMapNode>
</siteMap>
Even with this technique, you're still limited to a
single site map tree, and it always starts with the Web.sitemap file.
But you can manage your site map more easily because you can factor some
of its content into separate files.
However, this seemingly nifty technique is greatly
limited because the site map provider doesn't allow duplicate URLs. This
means you have no way to reuse the same page in more than one branch of
a site map. Although you can try to work around this problem by
creating different URLs that are equivalent (for example, by adding
query string parameters on the end), this raises more headaches. Sadly,
this problem has no solution with the default site map provider that
ASP.NET includes.
6. The SiteMap Class
You aren't limited to no-code data binding in order
to display navigation hierarchies. You can interact with the navigation
information programmatically. This allows you to retrieve the current
node information and use it to configure details such as the page
heading and title. All you need to do is interact with the objects that
are readily available through the Page class.
The site map API is remarkably straightforward. To
use it, you need to work with two classes from the System.Web namespace.
The starting point is the SiteMap class, which provides the shared
properties CurrentNode (the site map node representing the current page)
and RootNode (the root site map node). Both of these properties return a
SiteMapNode object. Using the SiteMapNode object, you can retrieve
information from the site map, including the title, description, and URL
values. You can branch out to consider related nodes using the
navigational properties in Table 2.
NOTE
You can also search for nodes using the methods
of the current SiteMapProvider object, which is available through the
SiteMap.Provider shared property. For example, the
SiteMap.Provider.FindSiteMapNode() method allows you to search for a
node by its URL.
Table 2. SiteMapNode Navigational Properties
| Property | Description |
|---|
| ParentNode | Returns
the node one level up in the navigation hierarchy, which contains the
current node. On the root node, this returns a null reference. |
| ChildNodes | Provides a collection of all the child nodes. You can check the HasChildNodes property to determine whether child nodes exist. |
| PreviousSibling | Returns the previous node that's at the same level (or a null reference if no such node exists). |
| NextSibling | Returns the next node that's at the same level (or a null reference if no such node exists). |
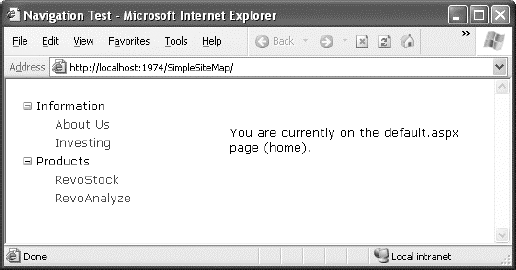
To see this in action, consider the following code,
which configures two labels on a page to show the heading and
description information retrieved from the current node:
Protected Sub Page_Load(ByVal sender As Object, _
  ByVal e As EventArgs) Handles Me.Load

    lblHead.Text = SiteMap.CurrentNode.Title
    lblDescription.Text = SiteMap.CurrentNode.Description
End Sub
If you're using master pages, you could place this
code in the code-behind for your master page, so that every page is
assigned its title from the site map.
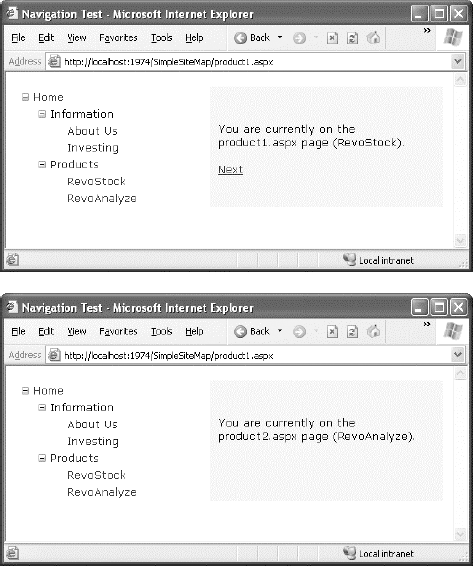
The next example is a little more ambitious. It
implements a Next link, which allows the user to traverse an entire set
of subnodes. The code checks for the existence of sibling nodes, and if
there aren't any in the required position, it simply hides the link:
Protected Sub Page_Load(ByVal sender As Object, _
  ByVal e As EventArgs) Handles Me.Load

    If SiteMap.CurrentNode.NextSibling IsNot Nothing Then
        lnkNext.NavigateUrl = SiteMap.CurrentNode.NextSibling.Url
        lnkNext.Visible = True
    Else
        lnkNext.Visible = False
    End If
End Sub
Figure 7
shows the result. The first picture shows the Next link on the
product1.aspx page. The second picture shows how this link disappears
when you navigate to product2.aspx (either by clicking the Next link or
the RevoAnalyze link in the TreeView).